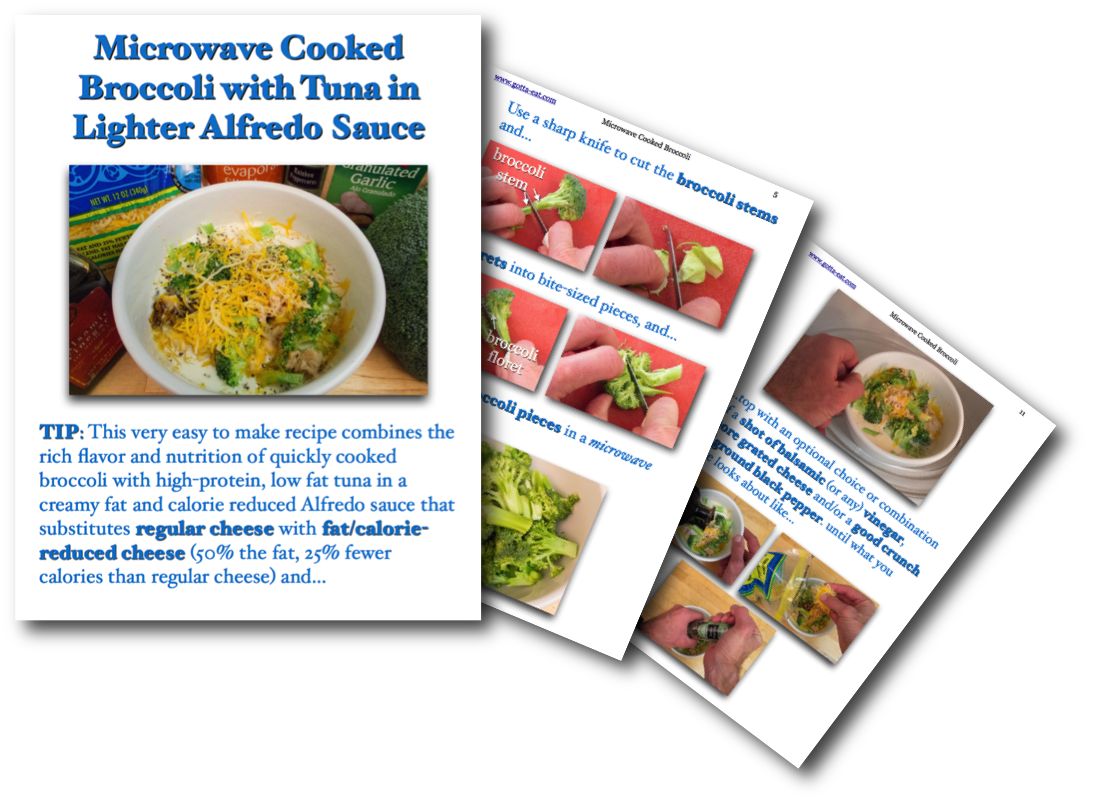
March 13th, 2024 Blog, Cycling Food, Fitness Food, VegetablesComments Off on Microwave Cooked Broccoli & Tuna in Lighter Alfredo Sauce – Easy & All in Pictures
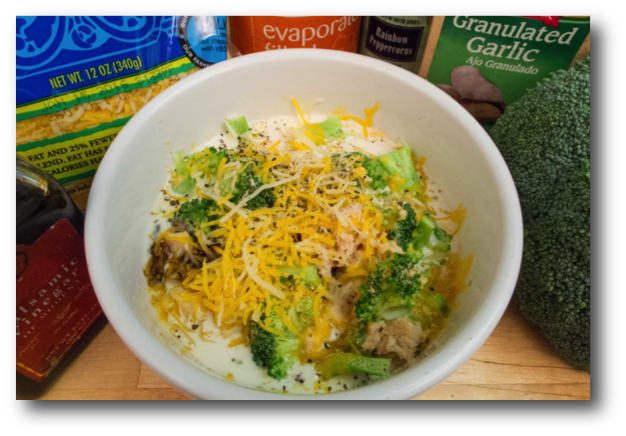
Here’s another recipe we worked on together through AARP-sponsored “Gotta’ Eat Well” senior citizen kitchen empowerment at Eastway Rec. Center in Charlotte last Thursday. As I told an engaged group of women, who have become a band of “let’s make something fun & flavorful” friends, making microwave cooked broccoli and tuna in a lighter Alfredo sauce is just one very easy and fantastically flavorful way to take microwave cooked broccoli from simple to exciting!
Here’s what you need for ingredients:
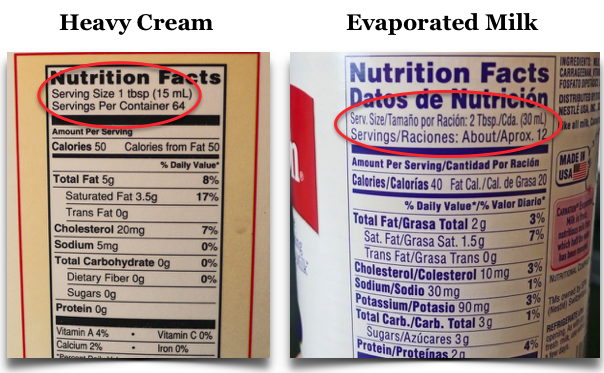
As shown in the ingredients picture above, the key to making the lighter Alfredo sauce is substituting heavy cream with evaporated milk and using fat-reduced (“lite”) cheese with no loss in Alfredo sauce flavor or creamy texture. Here’s a nutrition label comparison showing that ounce for ounce, heavy cream contains more than twice the calories and five times the fat as evaporated milk (1 ounce = 2 tablespoons; you have to double the numbers you see in the heavy cream label to make an equal comparison with evaporated milk).
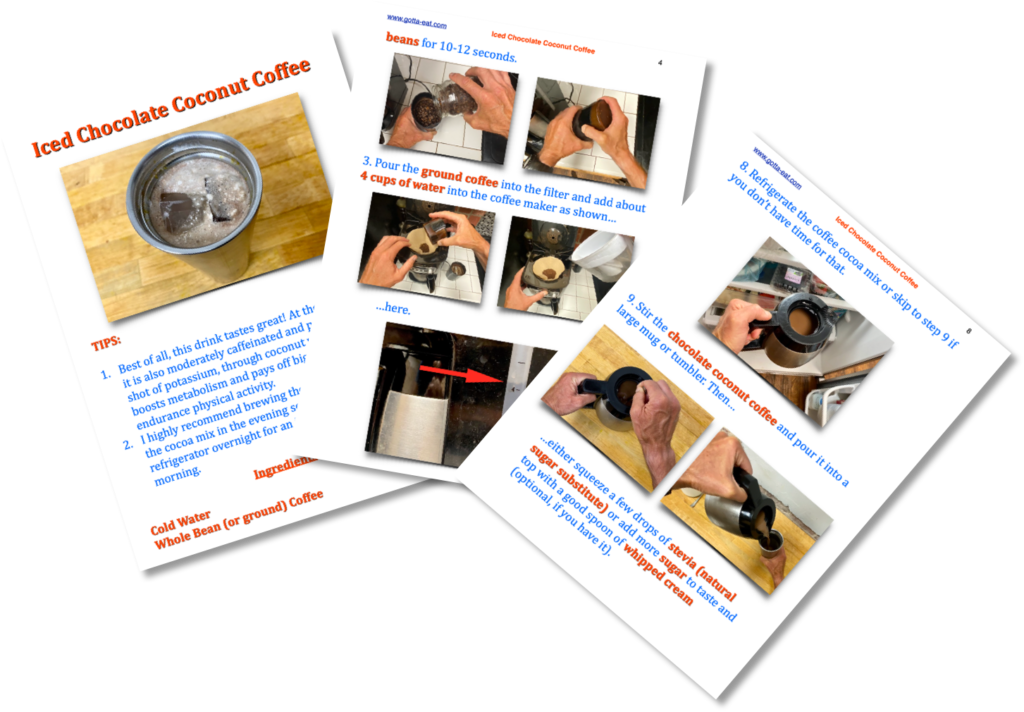
Click any picture on this page for a complete, easy-to-follow step-by-step picture book recipe.
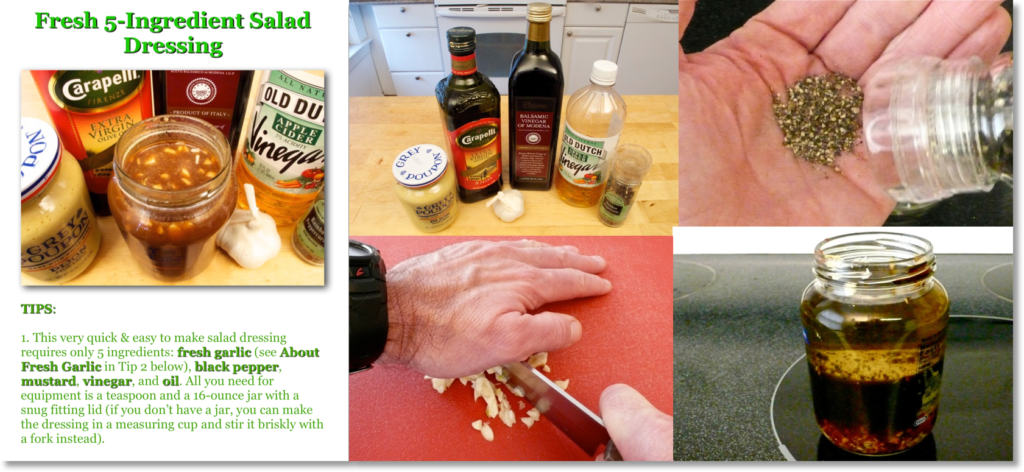
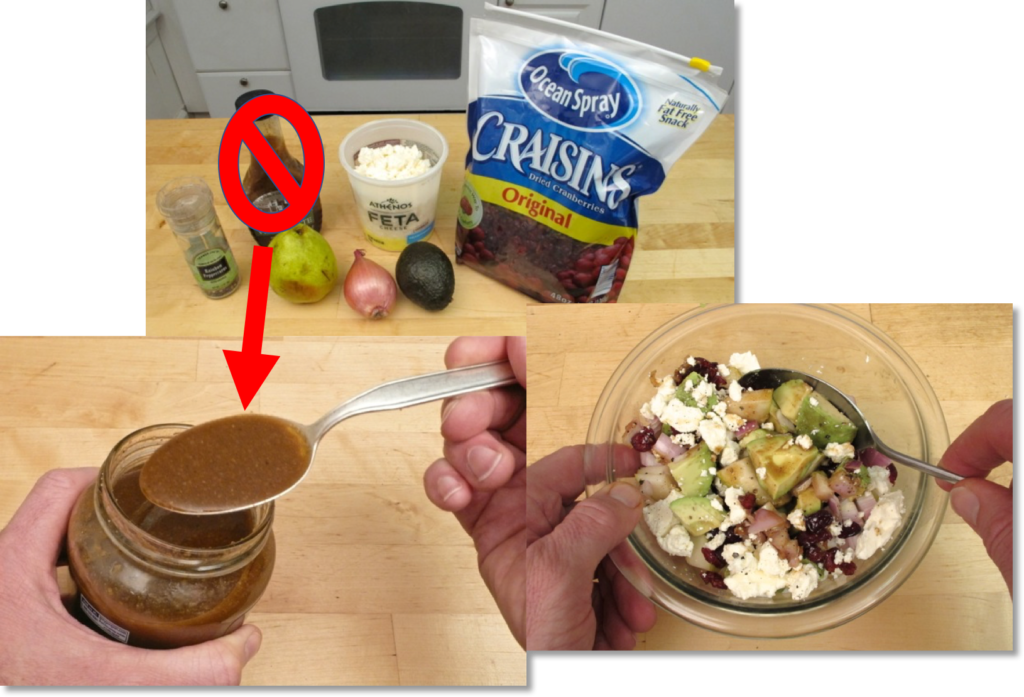
About a month ago, I posted this extremely easy-to-make Instant 5-Ingredient Salad Dressing that’s so versatile, it goes great, of course, on salads, but also on pasta, rice, sandwiches, cooked vegetables – imagination is your only limit.
This post is about how to make that dressing fresh-er just by substituting garlic powder with fresh garlic.
I’m a big fan of fresh garlic for its rich, bold flavor – and its broad spectrum health benefits that include: improved immune system, lowered blood pressure and cholesterol, cancer prevention, improved athletic performance – and more (for more details in short, easy-to-read form, click this Spice World link).
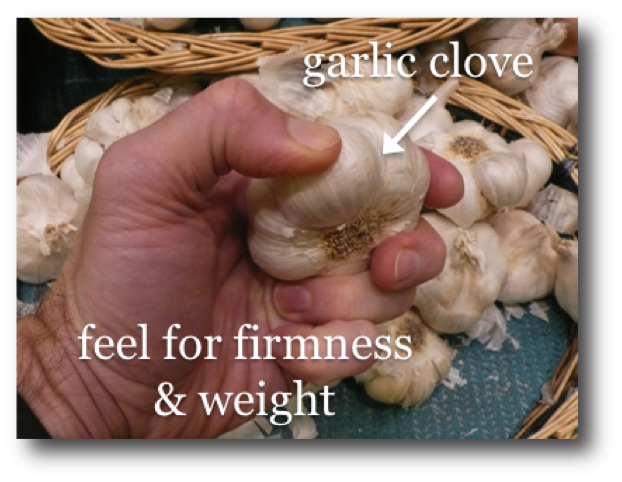
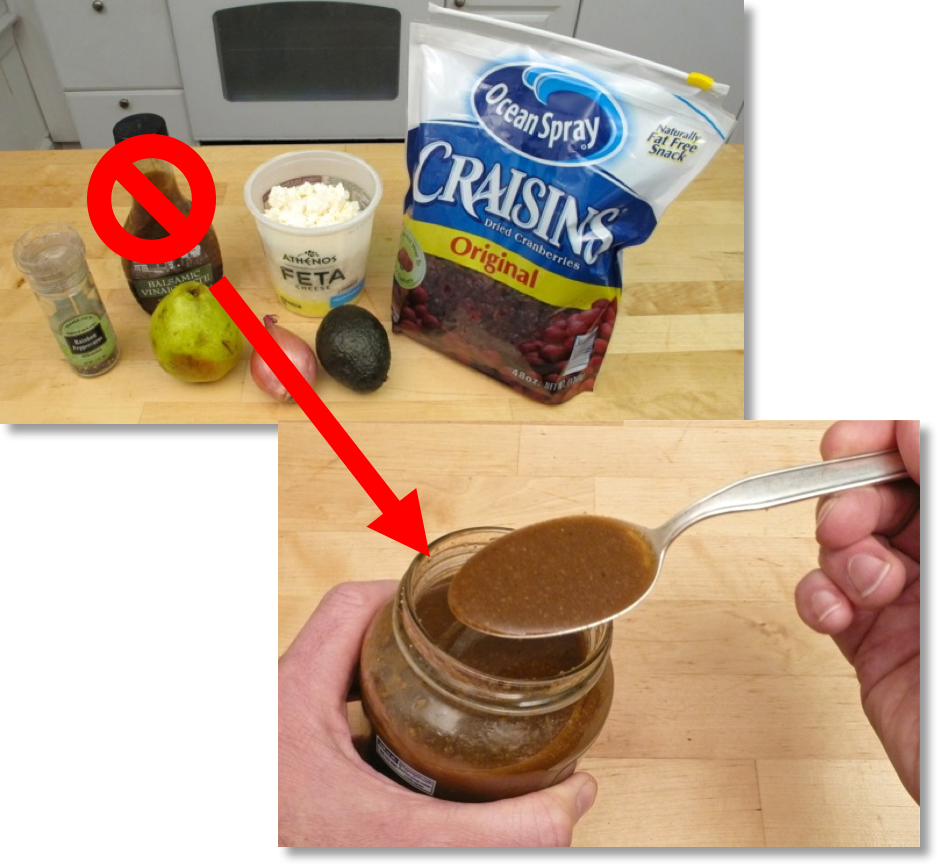
Two quick practical tips about fresh garlic. First, choose fresh garlic bulbs, like the one shown below, that are firm to a hand squeeze, heavier in weight (more water content) and show no signs of dark grey mold under the skin or green shoots growing out of the bulb.
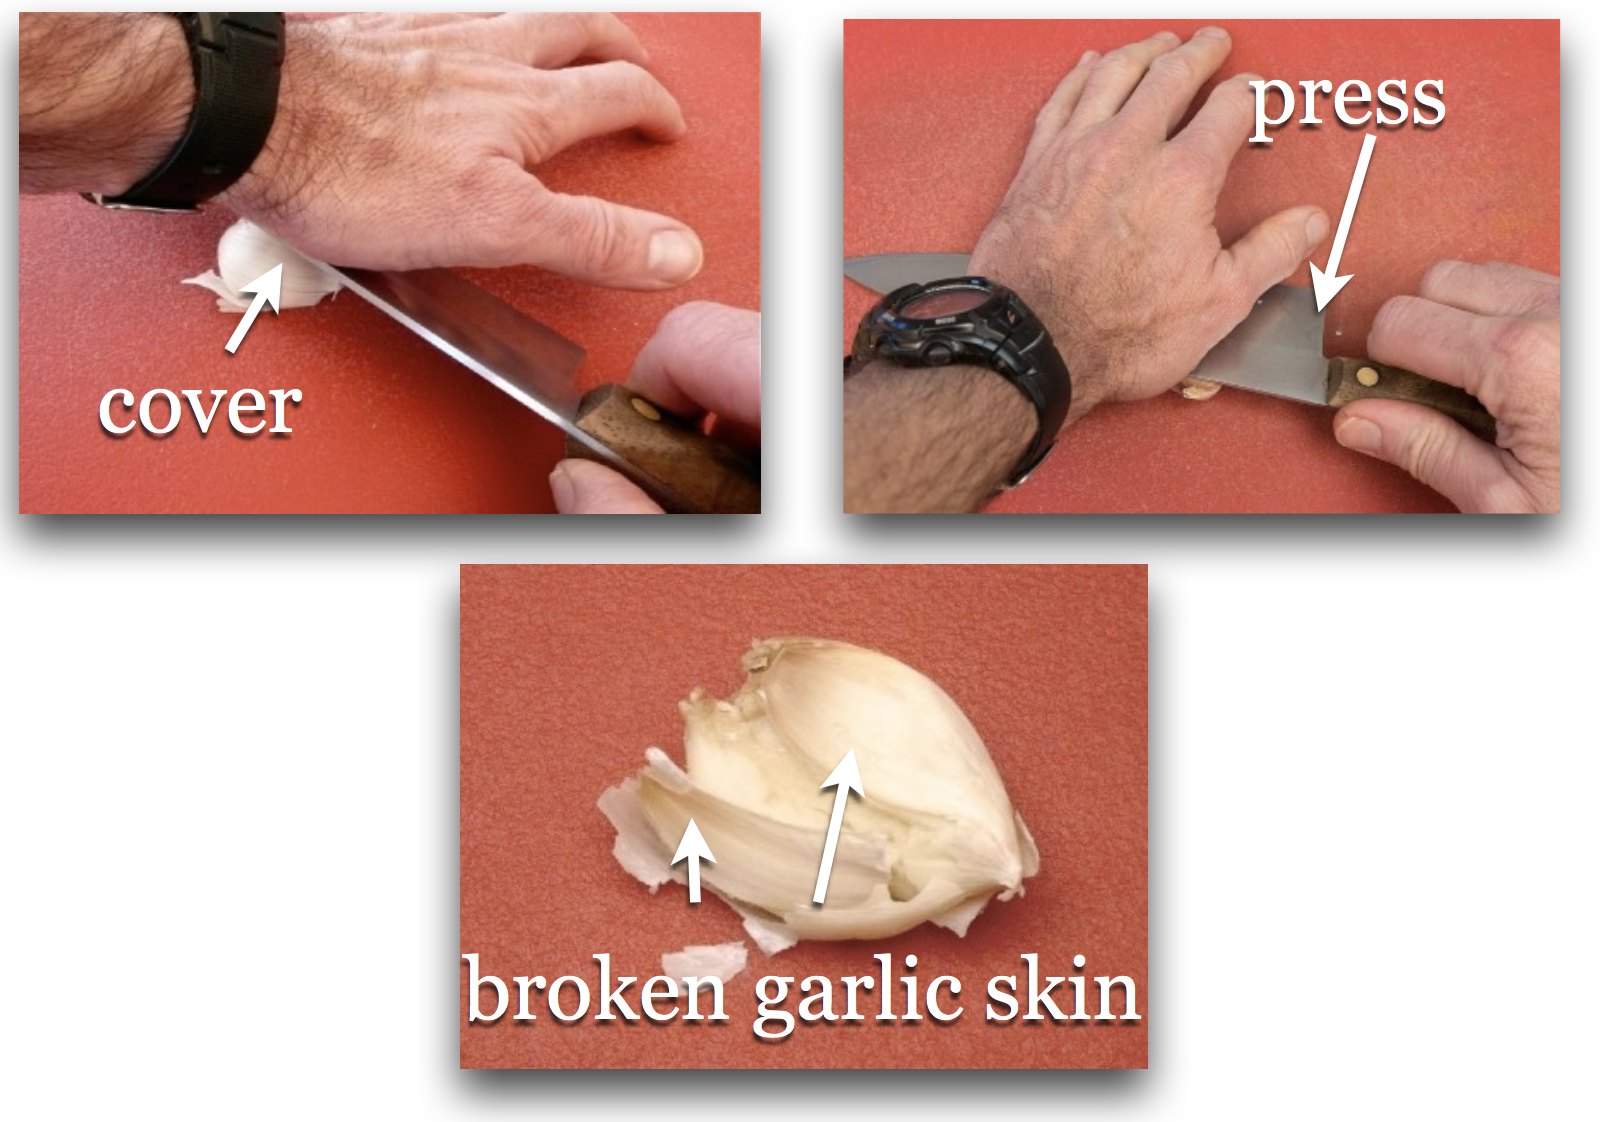
Second, to make peeling the garlic skin easy, which is the least fun part about dealing with fresh garlic, first crunch the individual garlic cloves with a forceful press and satisfying garlic skin pop using the side of a wide-bladed chef’s knife, as shown here.
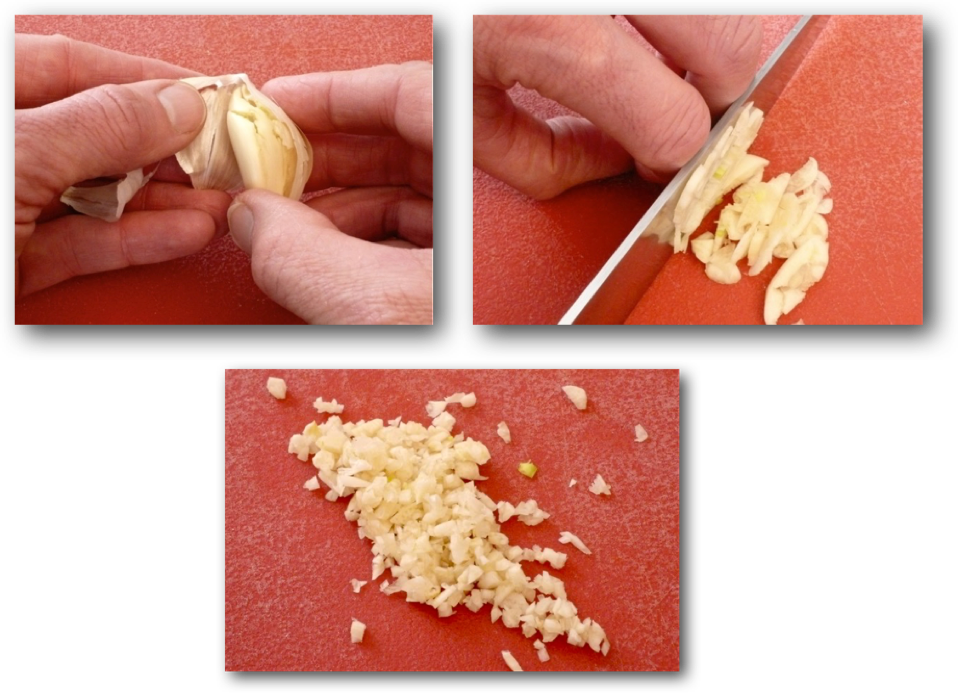
Once you chop the fresh garlic, as shown briefly below, the rest is all down hill. Just add mustard, ground black pepper, vinegar and yogurt.
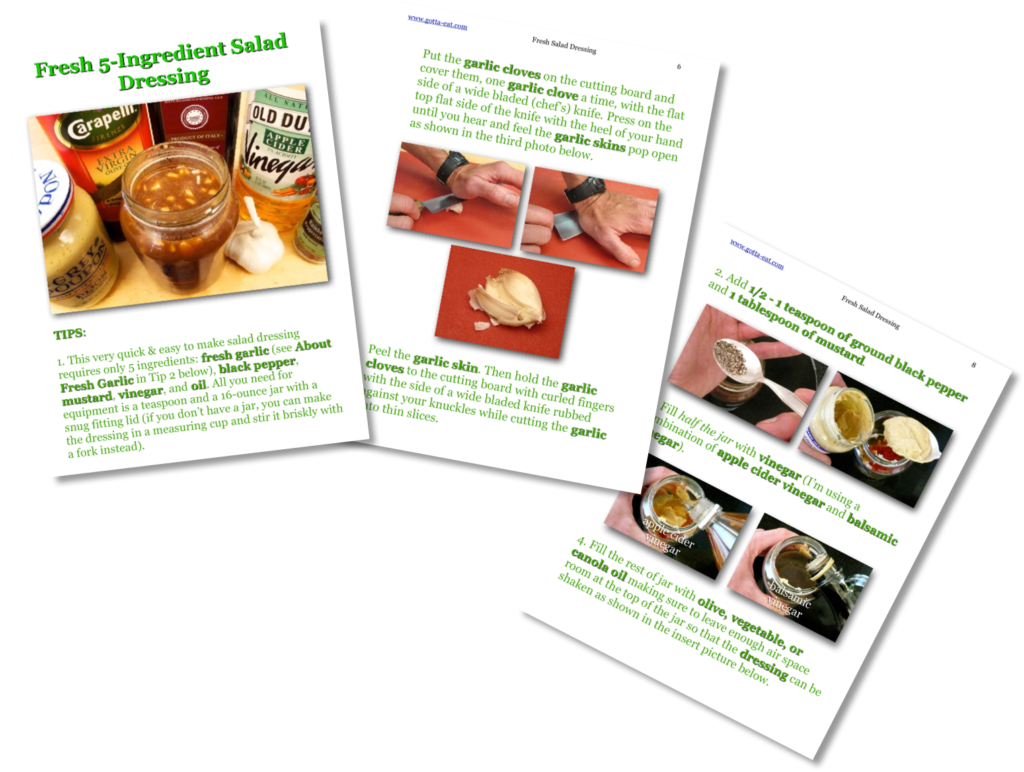
You can see all the above – and more – by clicking this link for the complete Fresh 5-Ingredient Salad Dressing picture book recipe.
Last post showed how to make a fully flavorful, exceptionally easy to make, highly versatile Instant 5-Ingredient Salad Dressing. I made that dressing most recently to start a “Gotta’ Eat Smartly” series of food demos with AARP at Eastway Recreation Center in Charlotte earlier this month. That series is designed to give senior citizens the hands-on kitchen skills and knowledge they need to empower themselves to make life-promoting/quality of life improving meals.
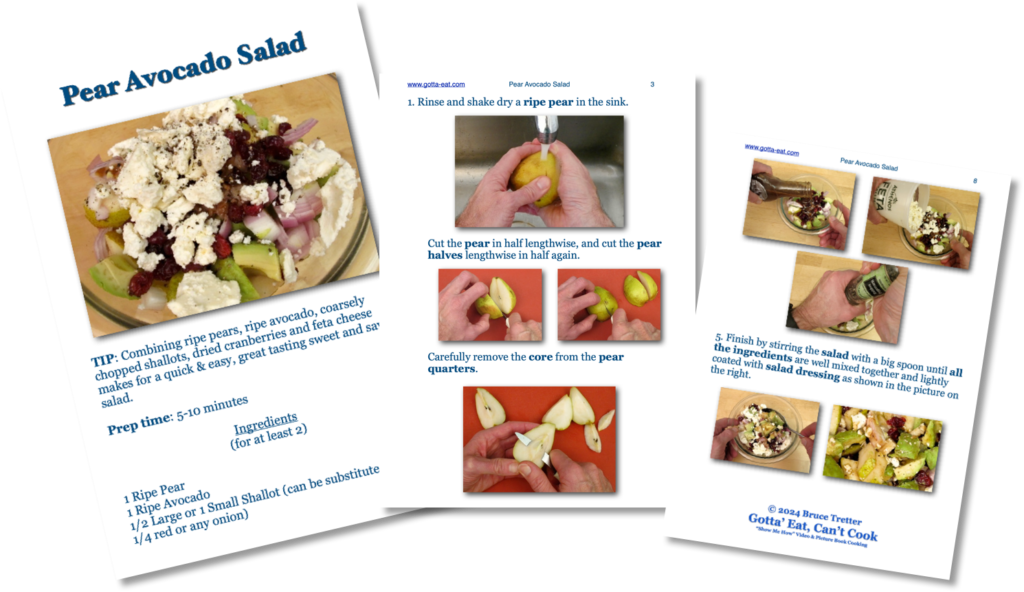
If you’re a regular to this site – or know me personally, you know flavor rules – always! Here’s an example. Sure, we could’ve used that Instant 5-Ingredient Salad dressing on a traditional lettuce and tomato salad, but where’s the flavor fun in that? So instead, I showed the group of a dozen very engaged women how to make a Pear and Avocado Salad – and then how to improvise on that very easy base recipe. First, here’s what you need to make the base recipe – and you’ll see that we replaced a store-bought salad dressing in the top picture with our Instant 5-Ingredient Salad Dressing.
I mentioned “improvising” above, and by improvising I mean adding or substituting ingredients based on either/both your taste and/or ingredients you have on hand – and remember, recipes are just guides. So, for example, I asked the women if they thought it would be ok to substitute or even supplement the pears with apples. Sure! And then I suggested adding adding flavors as they liked based on personal taste.
That last sentence fired up a lively discussion. “Can I add chicken or any other meat?” Yes! “What about fresh herbs?” Sure!
“What about adding potato salad?” Absolutely! And that potato salad question led to a talk about mayonnaise in potato salad and which mayonnaise brand I like. My comment: I don’t like using processed foods, like store-bought mayonnaise, with long paragraphs of ingredients, some of which are NOT found in nature. So, I improvise and substitute mayonnaise with Greek yogurt, mustard and spices.
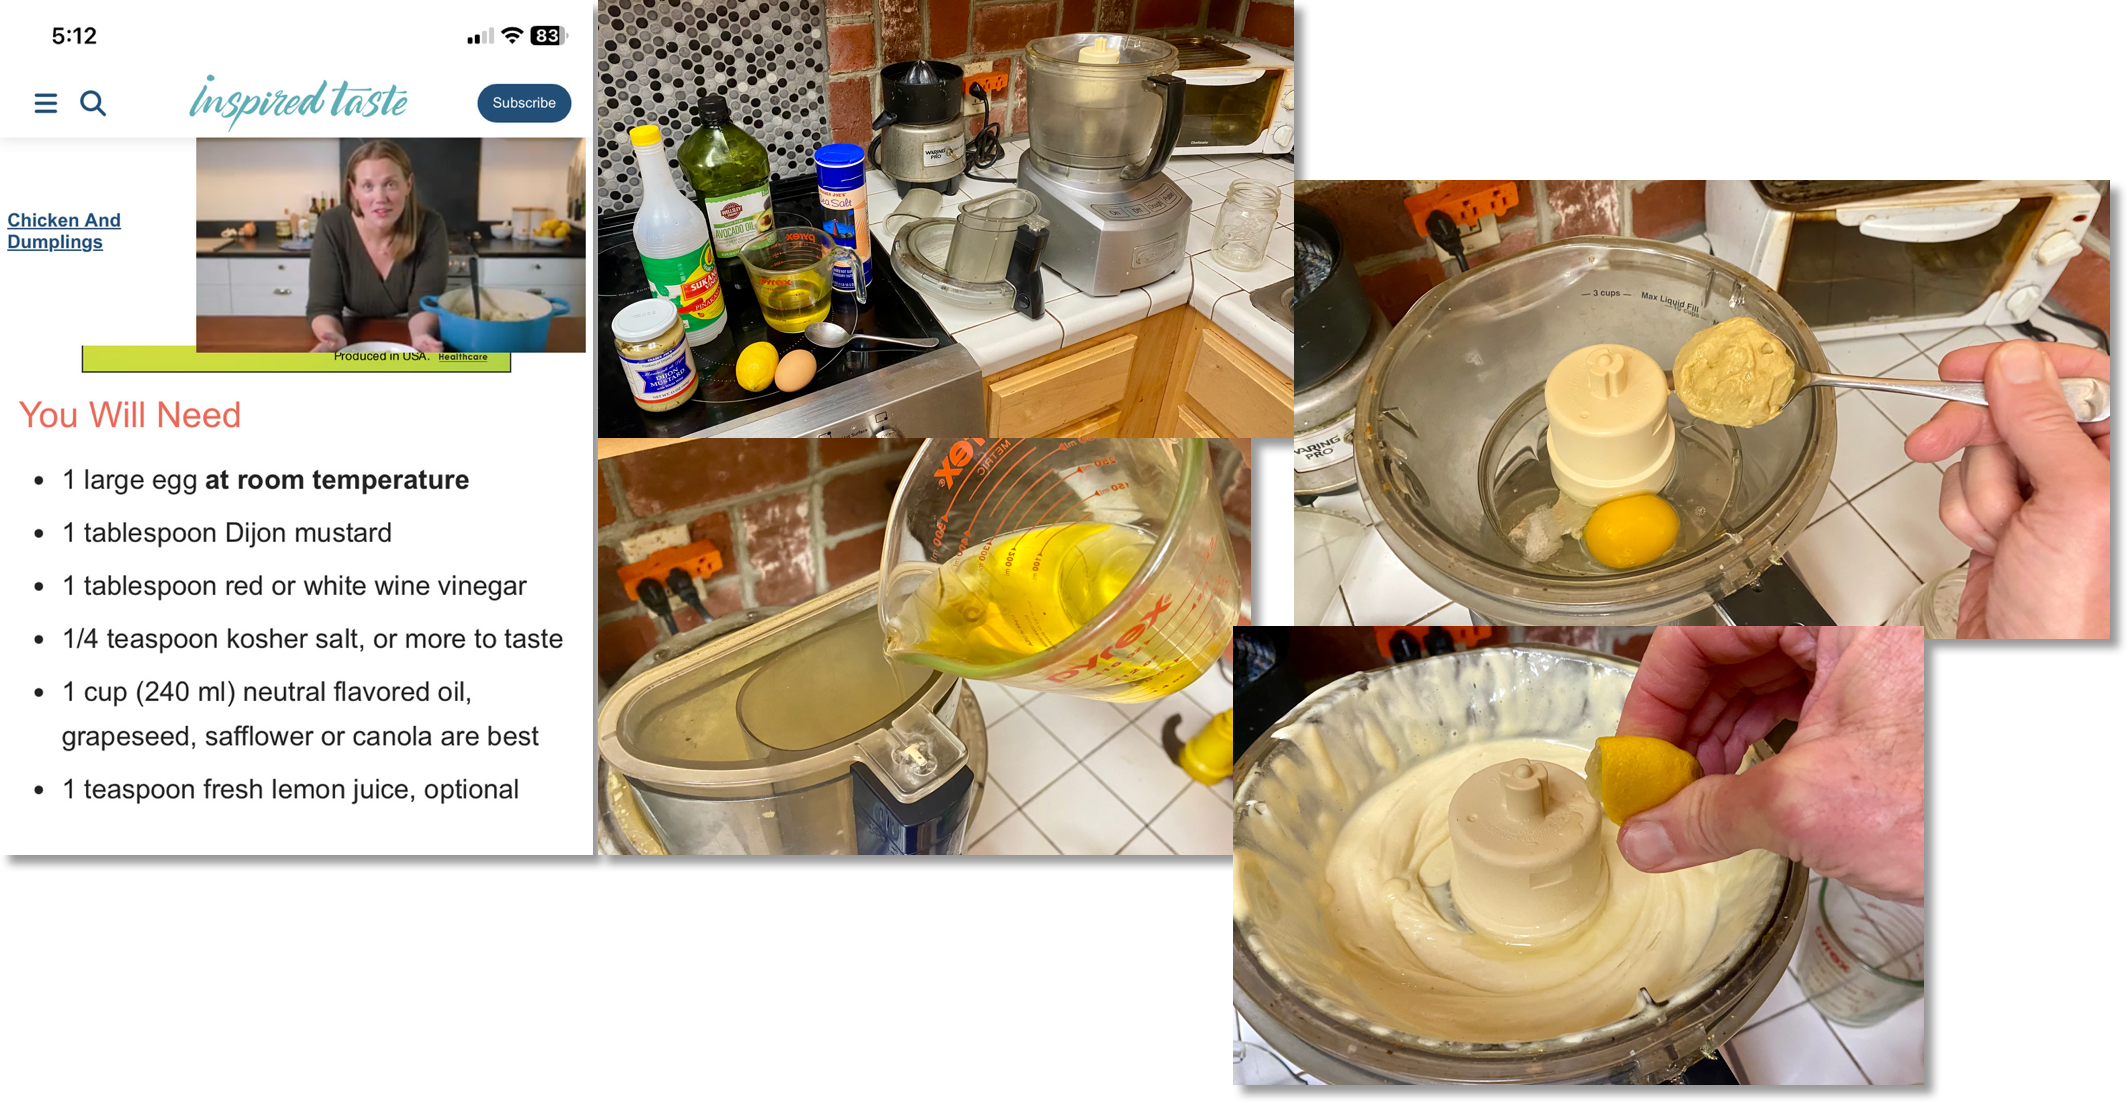
“If you do that, then what about making homemade mayonnaise?” one of the women asked. “A friend of mine makes it all the time and says it’s easy.” Great idea! I’ve never made it before, but I’ll learn and we’ll make it together next time we’re together.
Next time is coming up fast: Thursday, February 8th – and I’ve already started practicing.
I first picked a top-rated homemade mayonnaise recipe from Inspired Taste. I then improvised a bit, as they suggested, and will need to do more of that. You know the flavor deal. I’m not rolling out my version until that flavor kicks it full-on.
In the meantime, back to the Pear and Avocado Salad featured here. Please click this link and pass it on for the easy to follow picture book recipe shown below. And remember: that recipe is just a guide. Play with it. Improvise. And, most of all, have fun!
Last post mentioned work I’ve just started with AARP (American Association of Retired People) and Eastway Rec. Center in Charlotte, NC, to help senior citizens empower themselves in the kitchen to make life-promoting foods.
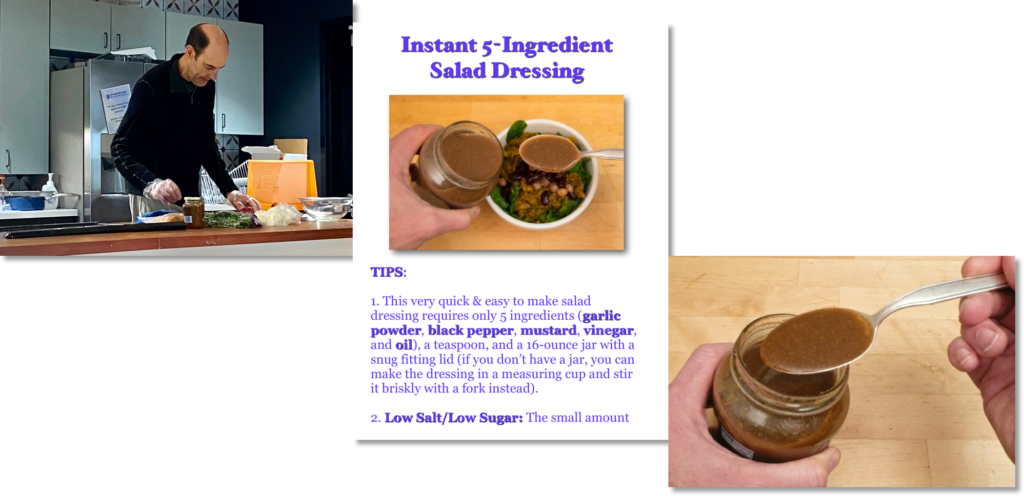
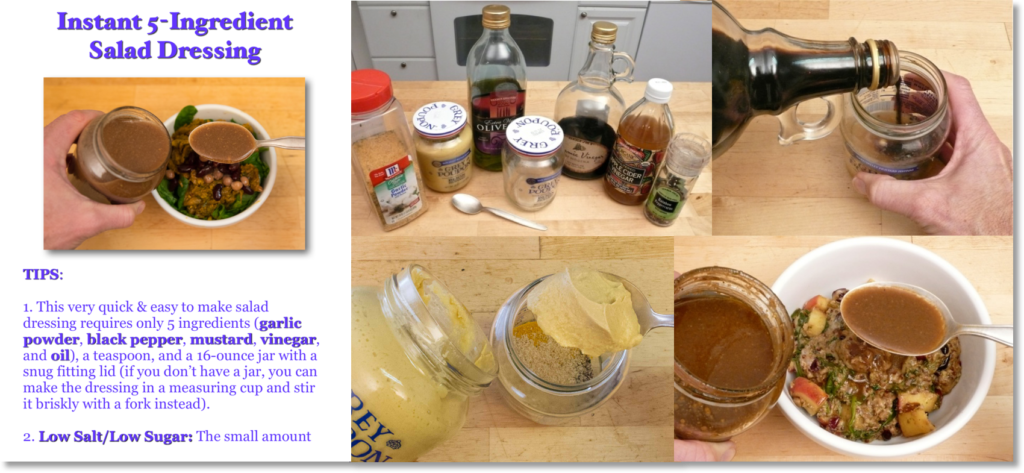
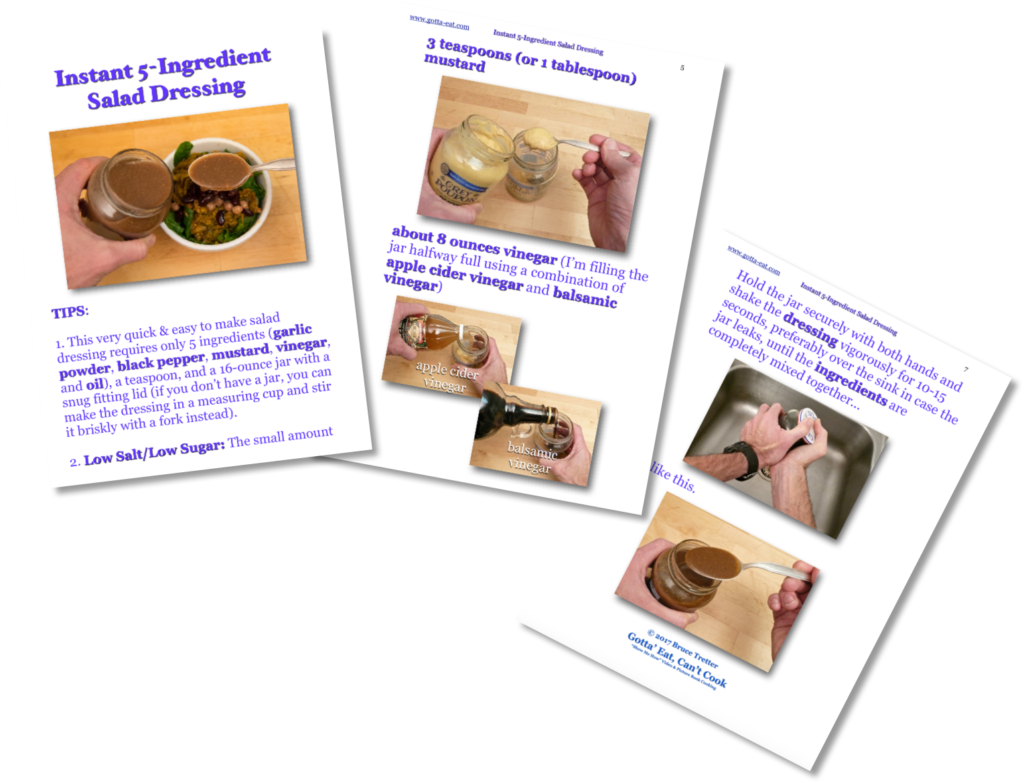
The first recipe we made together was the Instant 5-Ingredient Salad Dressing shown below, which is just as incredibly versatile as it is easy to make.
First, a quick back story. The first time I ever made this recipe was with a group of fellow veterans who were turning their lives around through Veterans Incorporated (Vets Inc.) in Shrewsbury, MA. One of the guys in the group, a fellow Navy veteran – and terrific character, chimed in when I listed the seven ingredients I intended to use: garlic powder, salt, ground black pepper, mustard, honey, vinegar and oil.
“Why do we need the added salt and sugar? A lot of guys here have diabetes and/or high blood pressure. We don’t need that _____(4-letter word for “stuff”)!”
I get blunt beautifully and had to agree about the added salt and sugar. But this was the first recipe I was rolling out with these guys and first time I’d ever met them. My inner thought: “Fine, I’ll cut the salt and honey – but, boy, this dressing’s gonna’ taste like crap.”
I quickly made the dressing and asked the guys to taste a spoon of it full-on before I tasted it myself. The stunner? They loved it – and so did I.
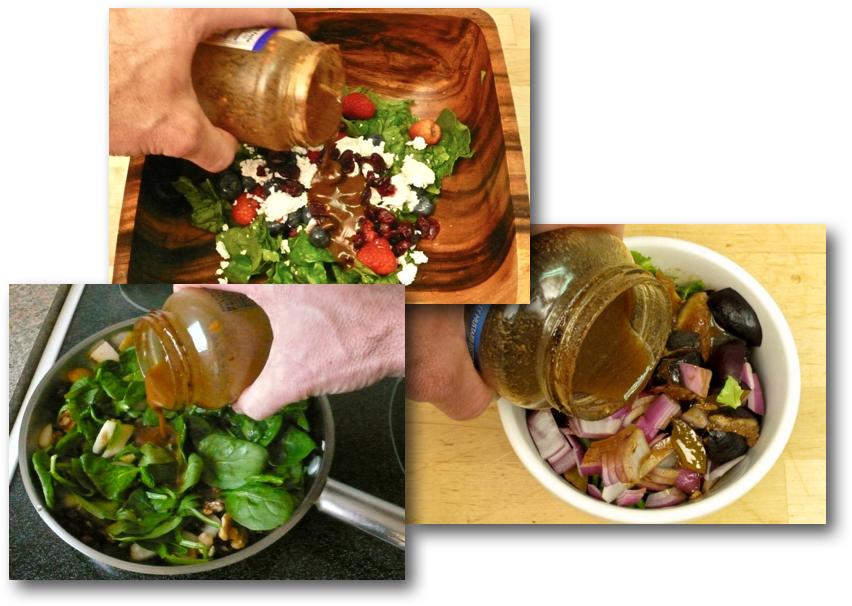
Not only does this dressing taste great (most important), but it’s also incredibly versatile. As shown in the few sample pictures below, it goes great on any kind of warm or cold salad, over cooked vegetables, meat, chicken, fish, pasta, rice – imagination is your only limit.
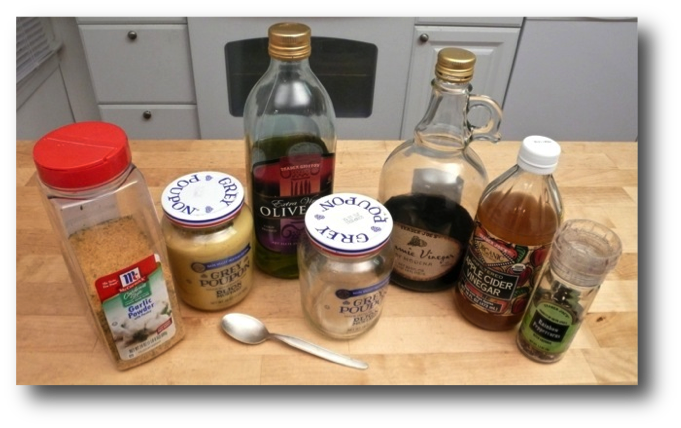
Here are the ingredients needed to make this salad dressing. You’ll actually see six ingredients below because I often use two different types of vinegars for added flavor, which you certainly don’t have to do.
Click this link or any picture on this page for a complete step-by-step picture recipe that includes information about the sourness of different vinegars and why this recipe is considered low in both salt and sugar.
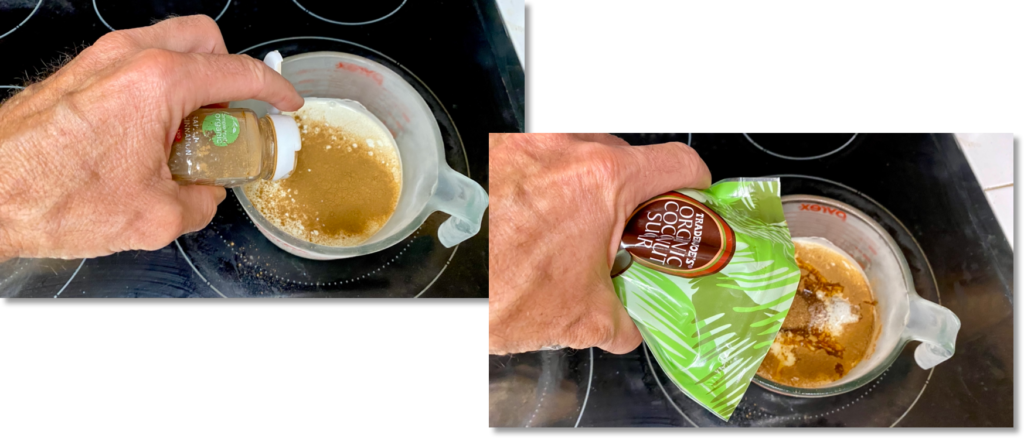
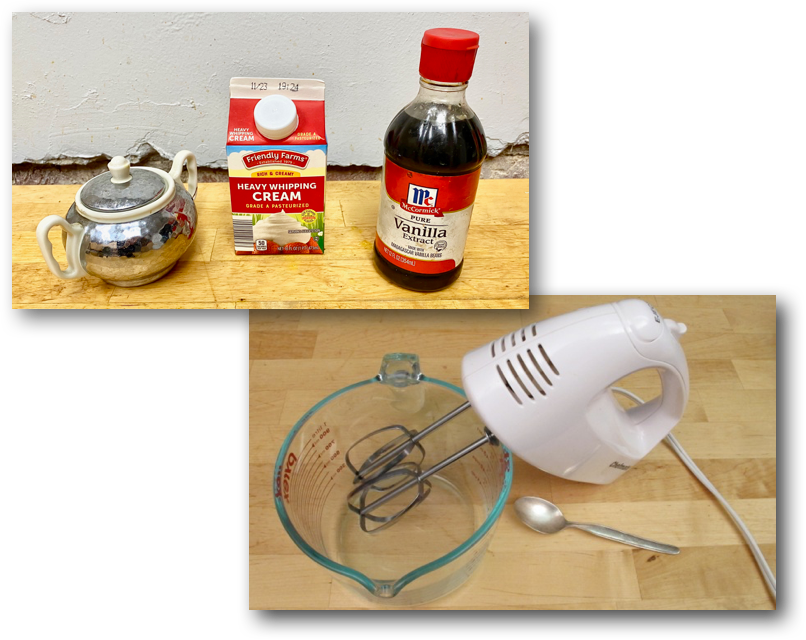
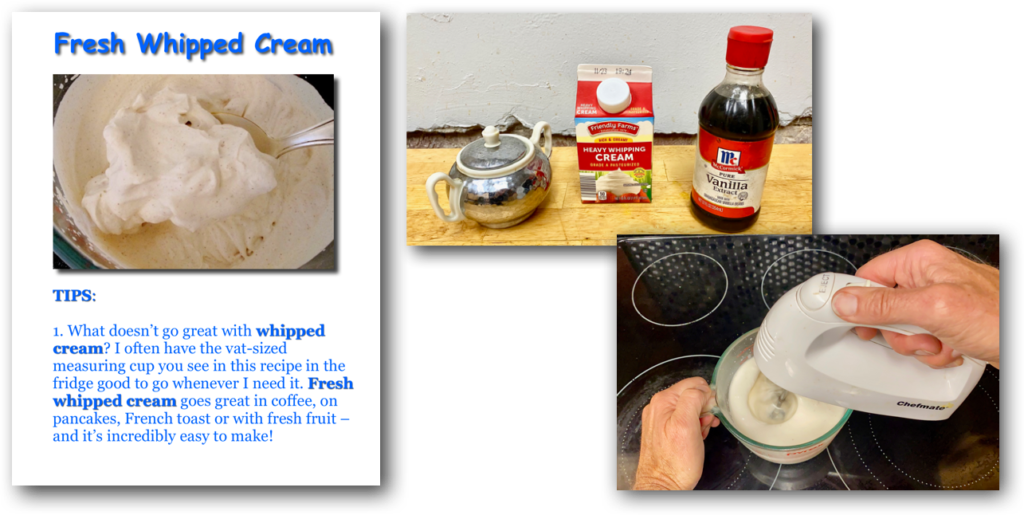
The other day I mentioned that I keep a vat of fresh whipped cream in the fridge. That vat went dry just after I wrote that. So, what a great opportunity to whip up a new one – and add flavor, all fun and very easily. As shown below, all I did was add a good shake of ground cinnamon (I do that all the time now) and use coconut sugar instead of regular white table sugar.
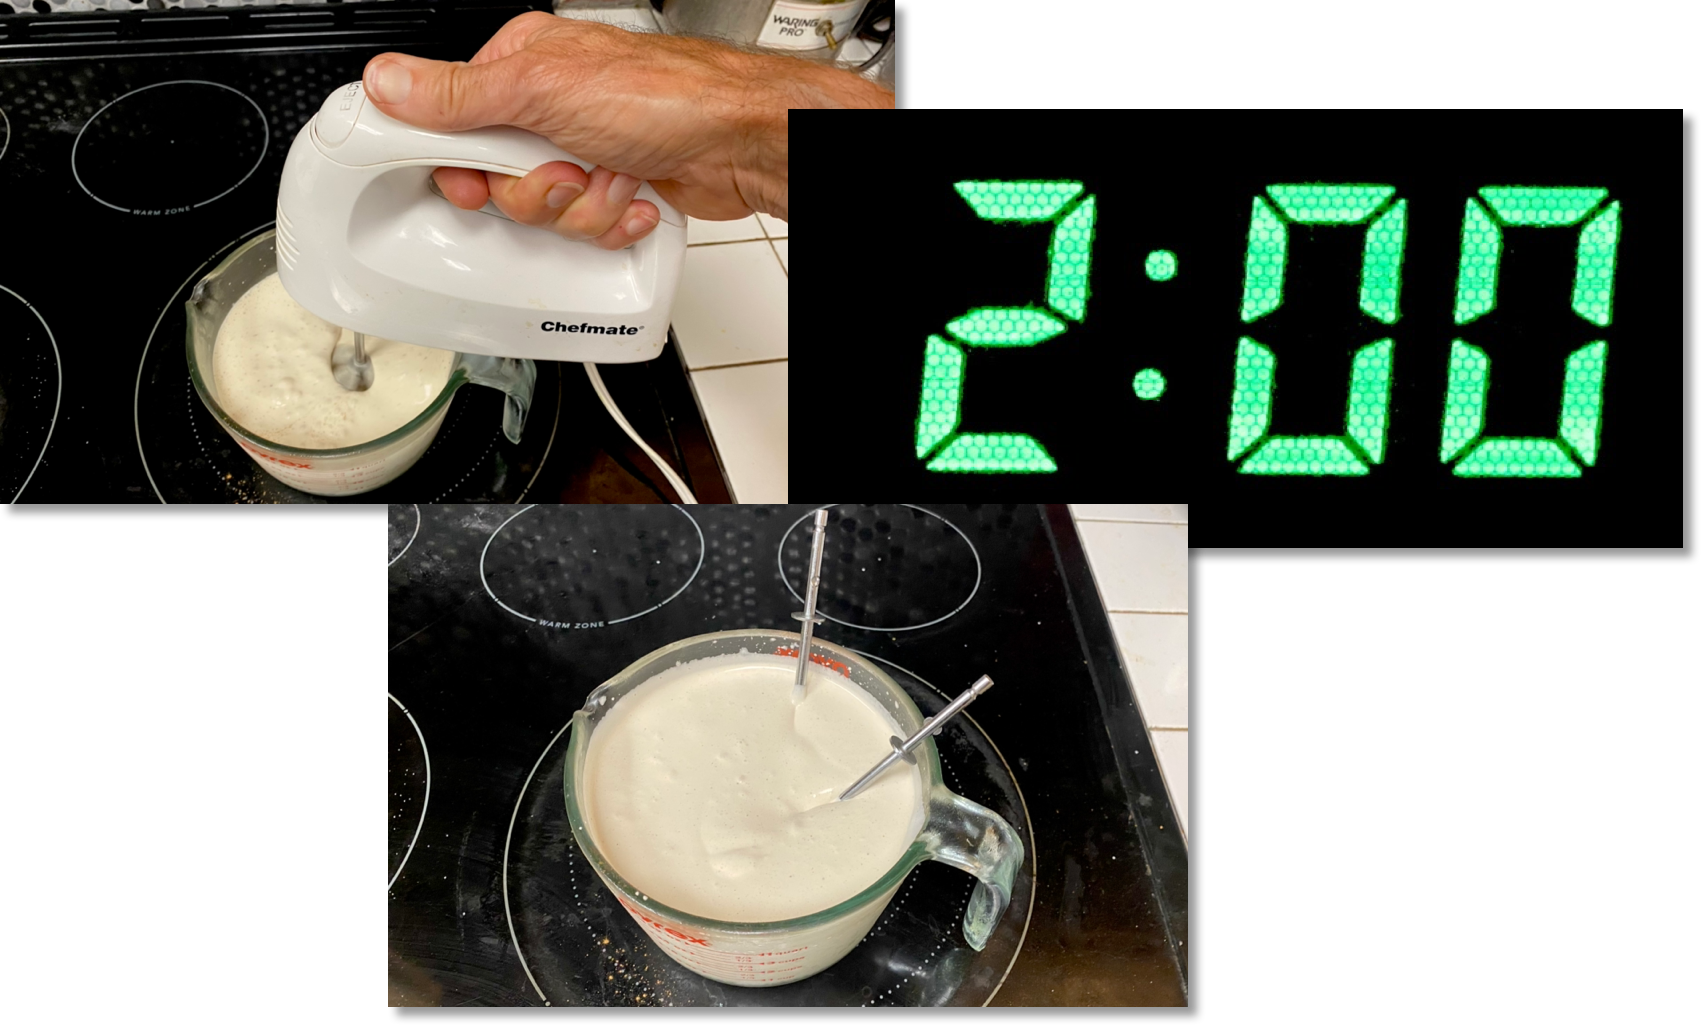
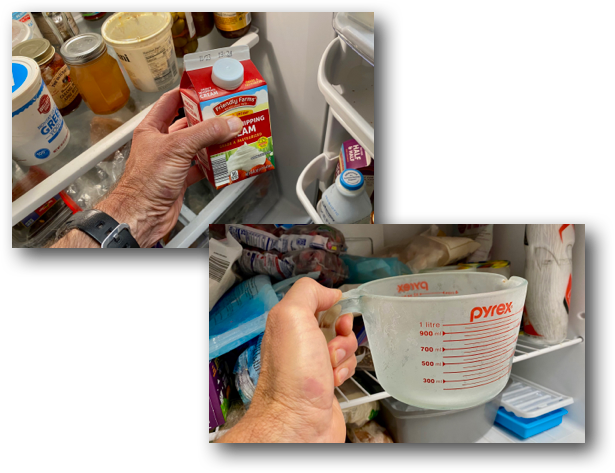
Whipping then took only 2 minutes as I’d used heavy cream right out of the fridge and a frosted glass measuring cup I’d put in the freezer over night.
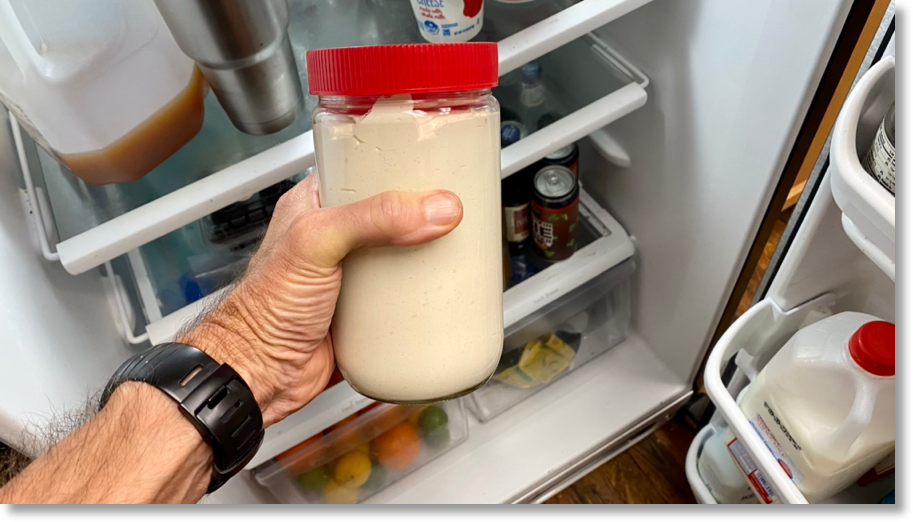
You’ll notice in the last shot above that I didn’t whip the cream until it was firm enough to keep the ejected hand mixer blades standing. All fine. That’s the consistency I like, as it dissolves more easily in coffee, works great on anything else I top with it and makes it easy to pour into a “vat” I put in the fridge for easy access anytime I want it.
Click any picture on this page for step-by-step picture book Fresh Whipped Cream directions that you can vary however your personal taste desires.
Fresh whipped cream tastes far better than whipped cream spritzed from a can or scooped from a plastic tub – and it’s both as incredibly easy to make as it is versatile to use. I love it with the “rocket fuel breakfast” you see above: on fruit pancake, with yogurt and fruit, in coffee. But, as always, imagination is your only limit!
Here’s what you need for both for ingredients and equipment – easy.
Before you get started, here’s an easy tip. Make sure the heavy cream is cold and put whatever container you’re going to use to whip the cream in the freezer until it is well chilled as shown below. The reason: cold cream and a cold container make the cream whip faster – I like that!
Please click any picture on this page or this link for step-by-step fresh whipped cream picture book directions – and enjoy!
Fruit, yogurt and more? Sure, always more! With full-on flavor – that’s half the fun of it. What you see above is what I put together to rocket-fuel up or an excellent hop on the bike with good buds this morning (below) – and with no need to refuel on the way.
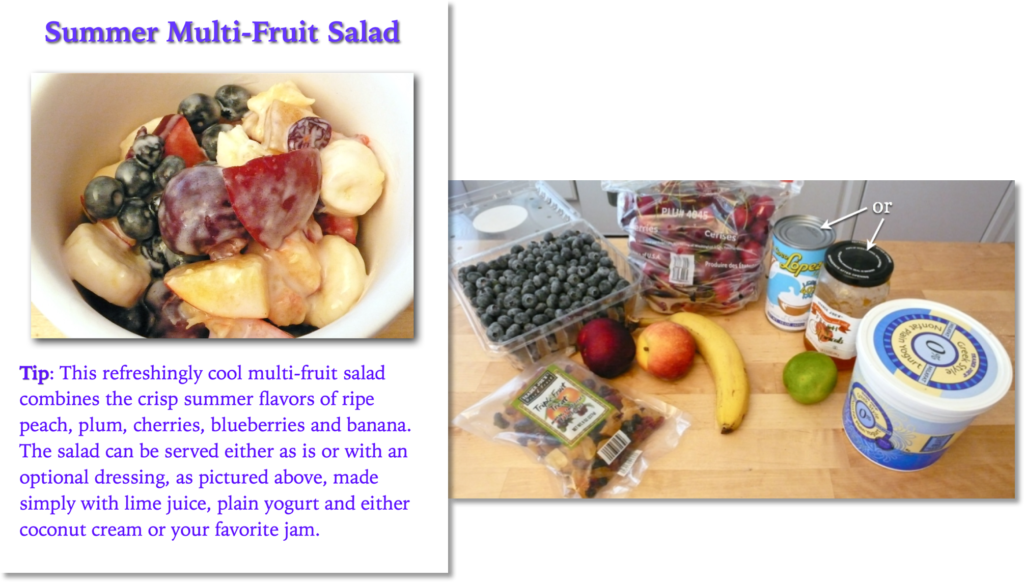
You can get the base recipe I used, Summer Multi-Fruit Salad, by clicking either this link or any picture on this page.
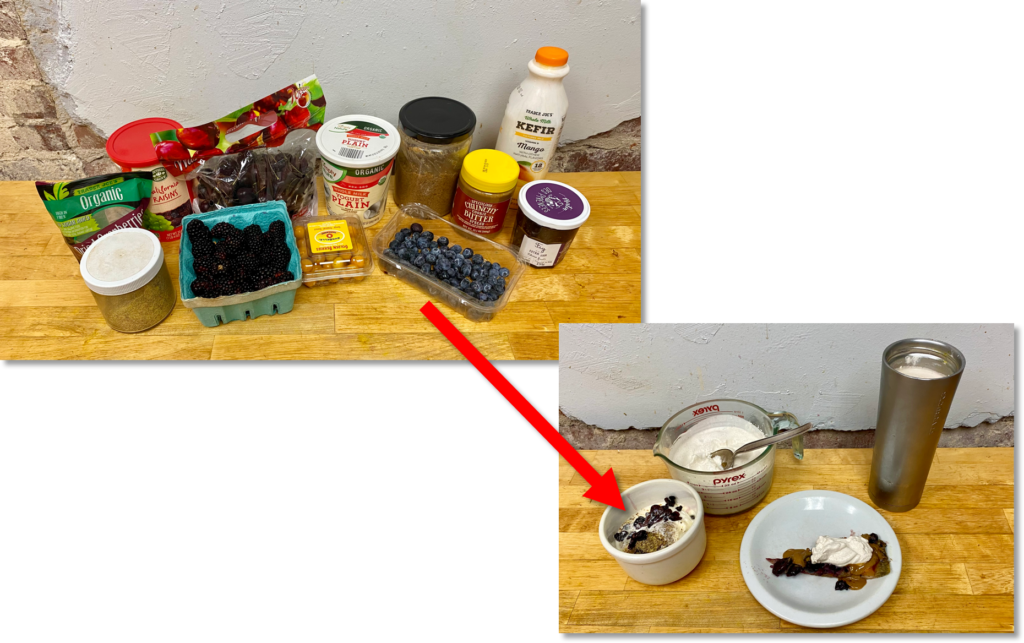
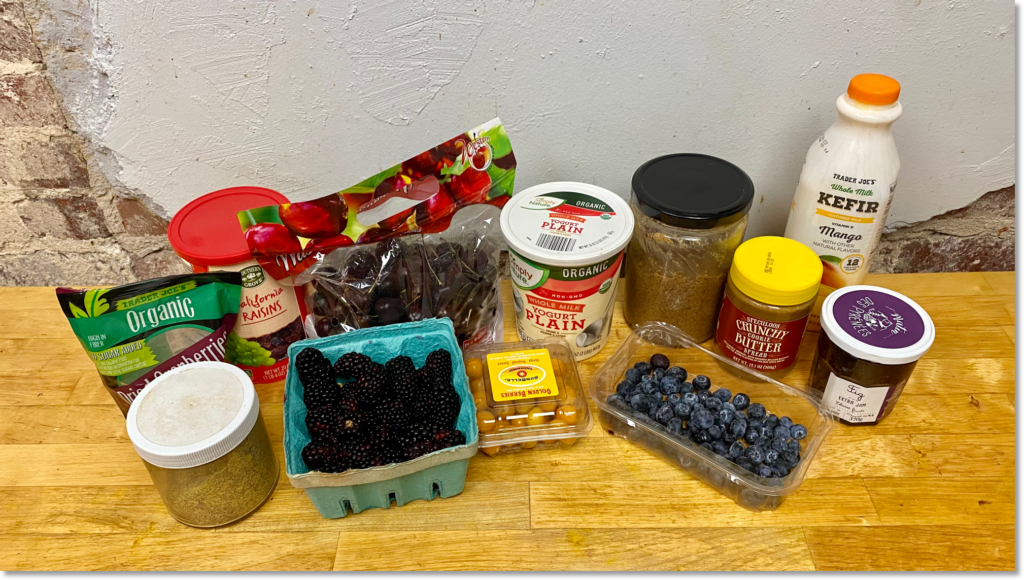
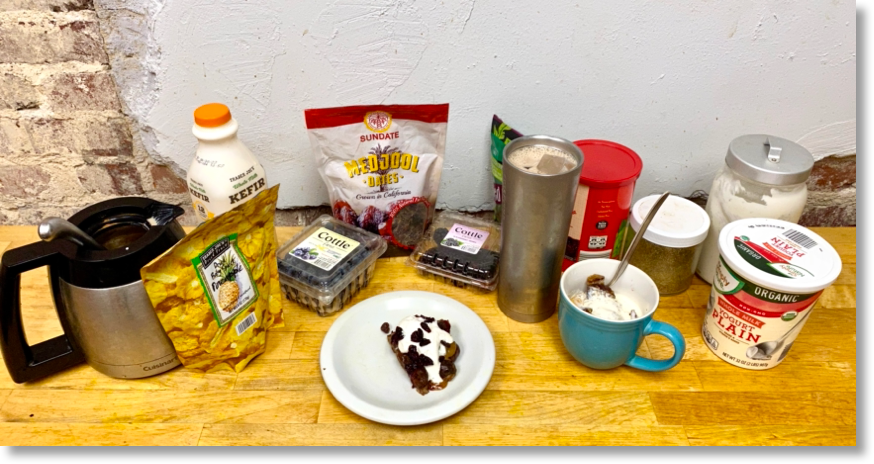
To mix it up a bit, here’s what I used for ingredients and…
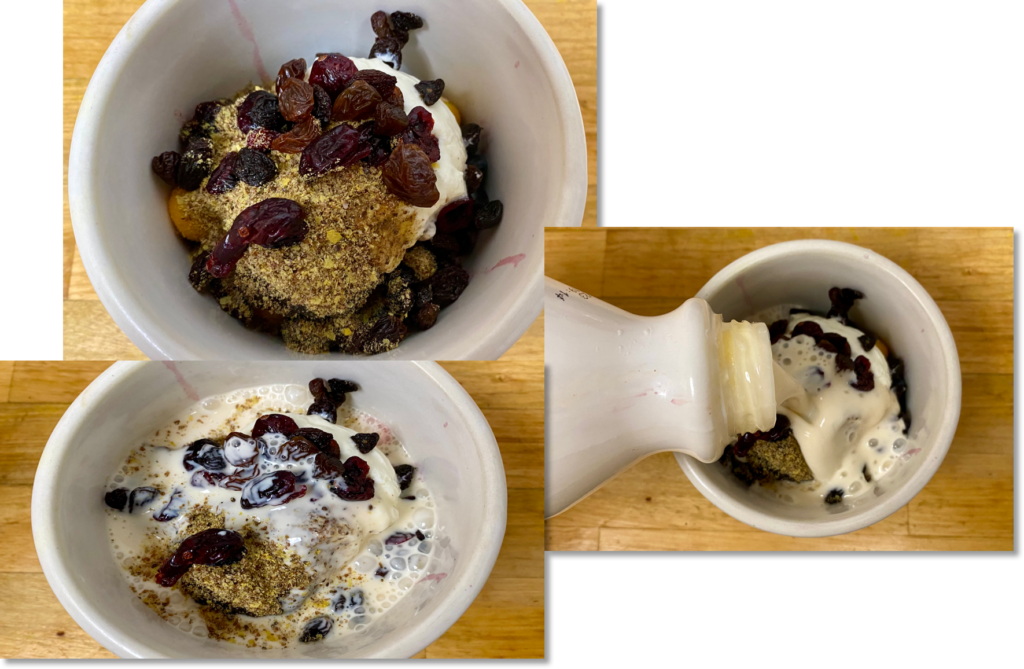
…how I put it all together – fruit first; then nut butter, cookie butter spread, jam; Greek yogurt & ground flaxseed with nutritional yeast…
The key word to an energy sustaining rocket fuel breakfast: opposition. Opposition here means counterbalancing complex instant “get up and go” energy carbohydrates with longer burning proteins and fats that provide “keep the drive alive” sustained energy.
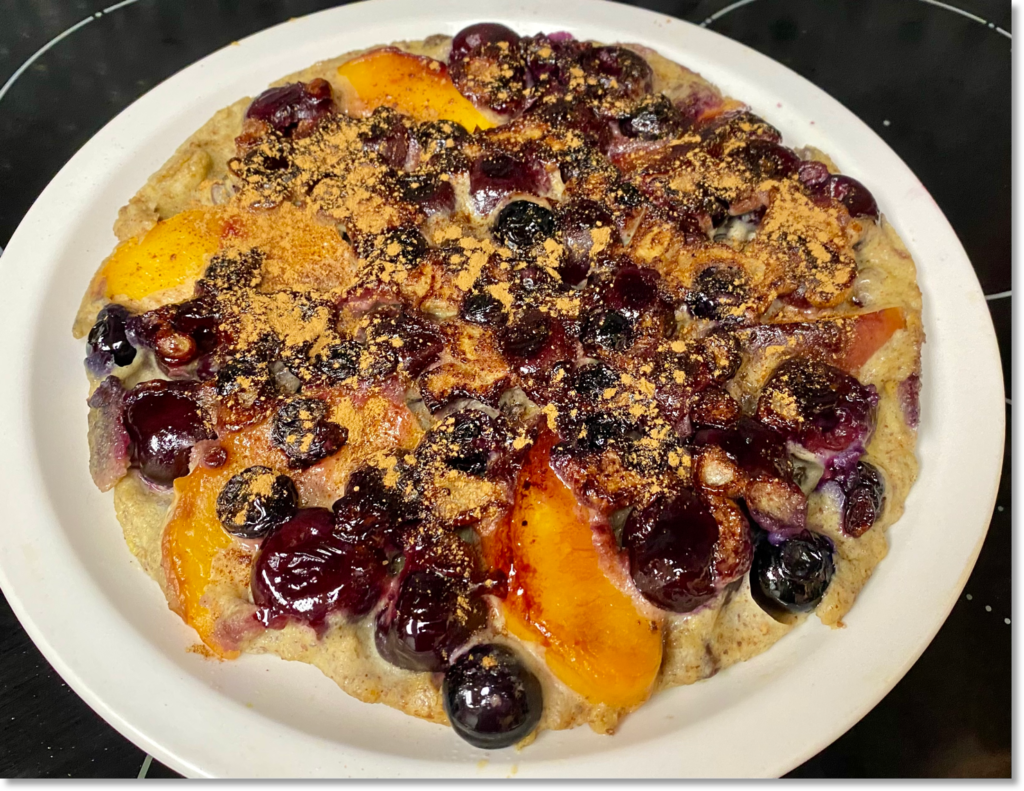
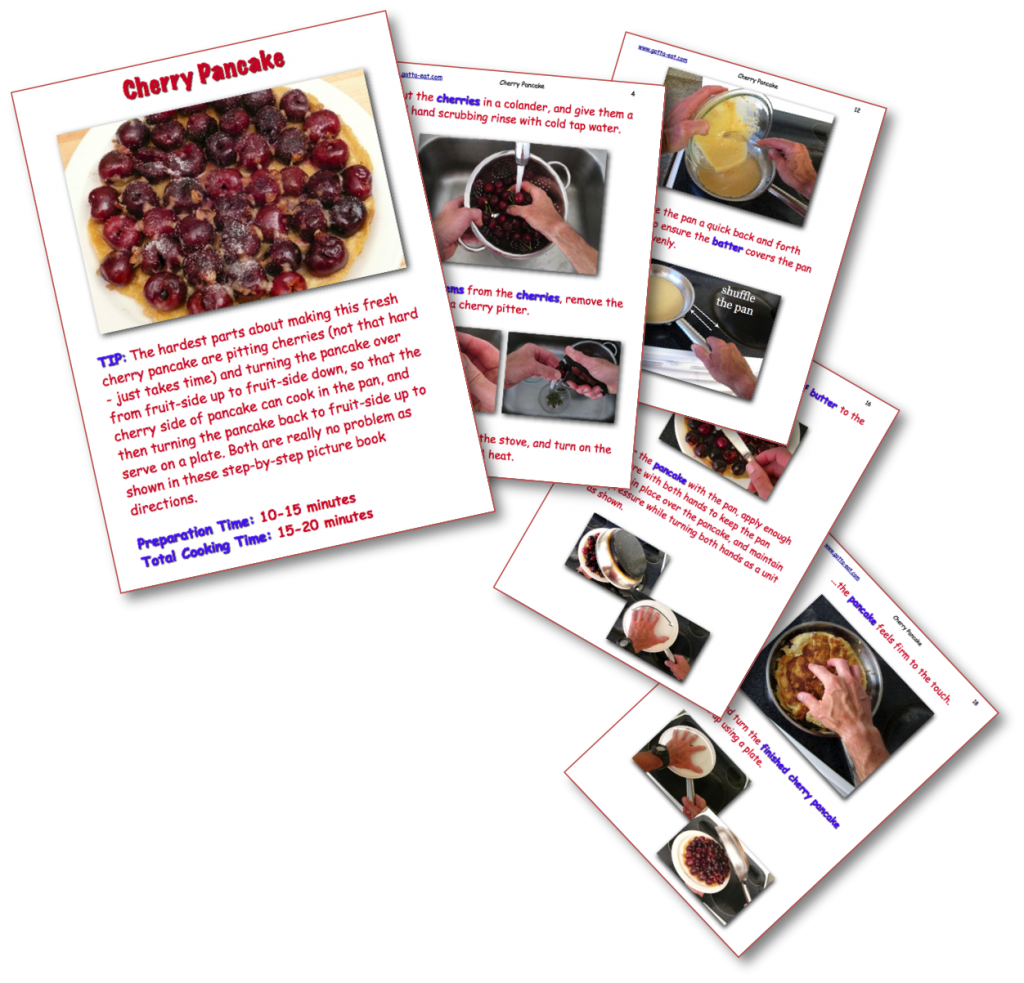
One of my favorites that wraps that combination all in one – with full-on flavor – is fresh fruit pancake like the cherry peach pancake shown here.
The best part about this pancake is that it’s nothing like traditional spongy, syrup-sucking flapjacks. No sir/ma’am! These pancakes are rich in protein, have just enough flour to keep them together as they cook in the pan and are packed with fresh fruit. Now, you won’t picture book directions for this specific cherry peach pancake because the only difference between it and the cherry pancake picture book recipe you can get here is the added fresh peach slices on top of the pancake as shown below – and, of course, you can substitute those peaches – or cherries – with any fresh fruit you like.
Click this link or any picture on this page to get the full cherry pancake step-by-step picture book recipe, and either have that pancake exactly as shown in the recipe (though cherries might be tough to find right now) or improvise with any fresh fruit you like.
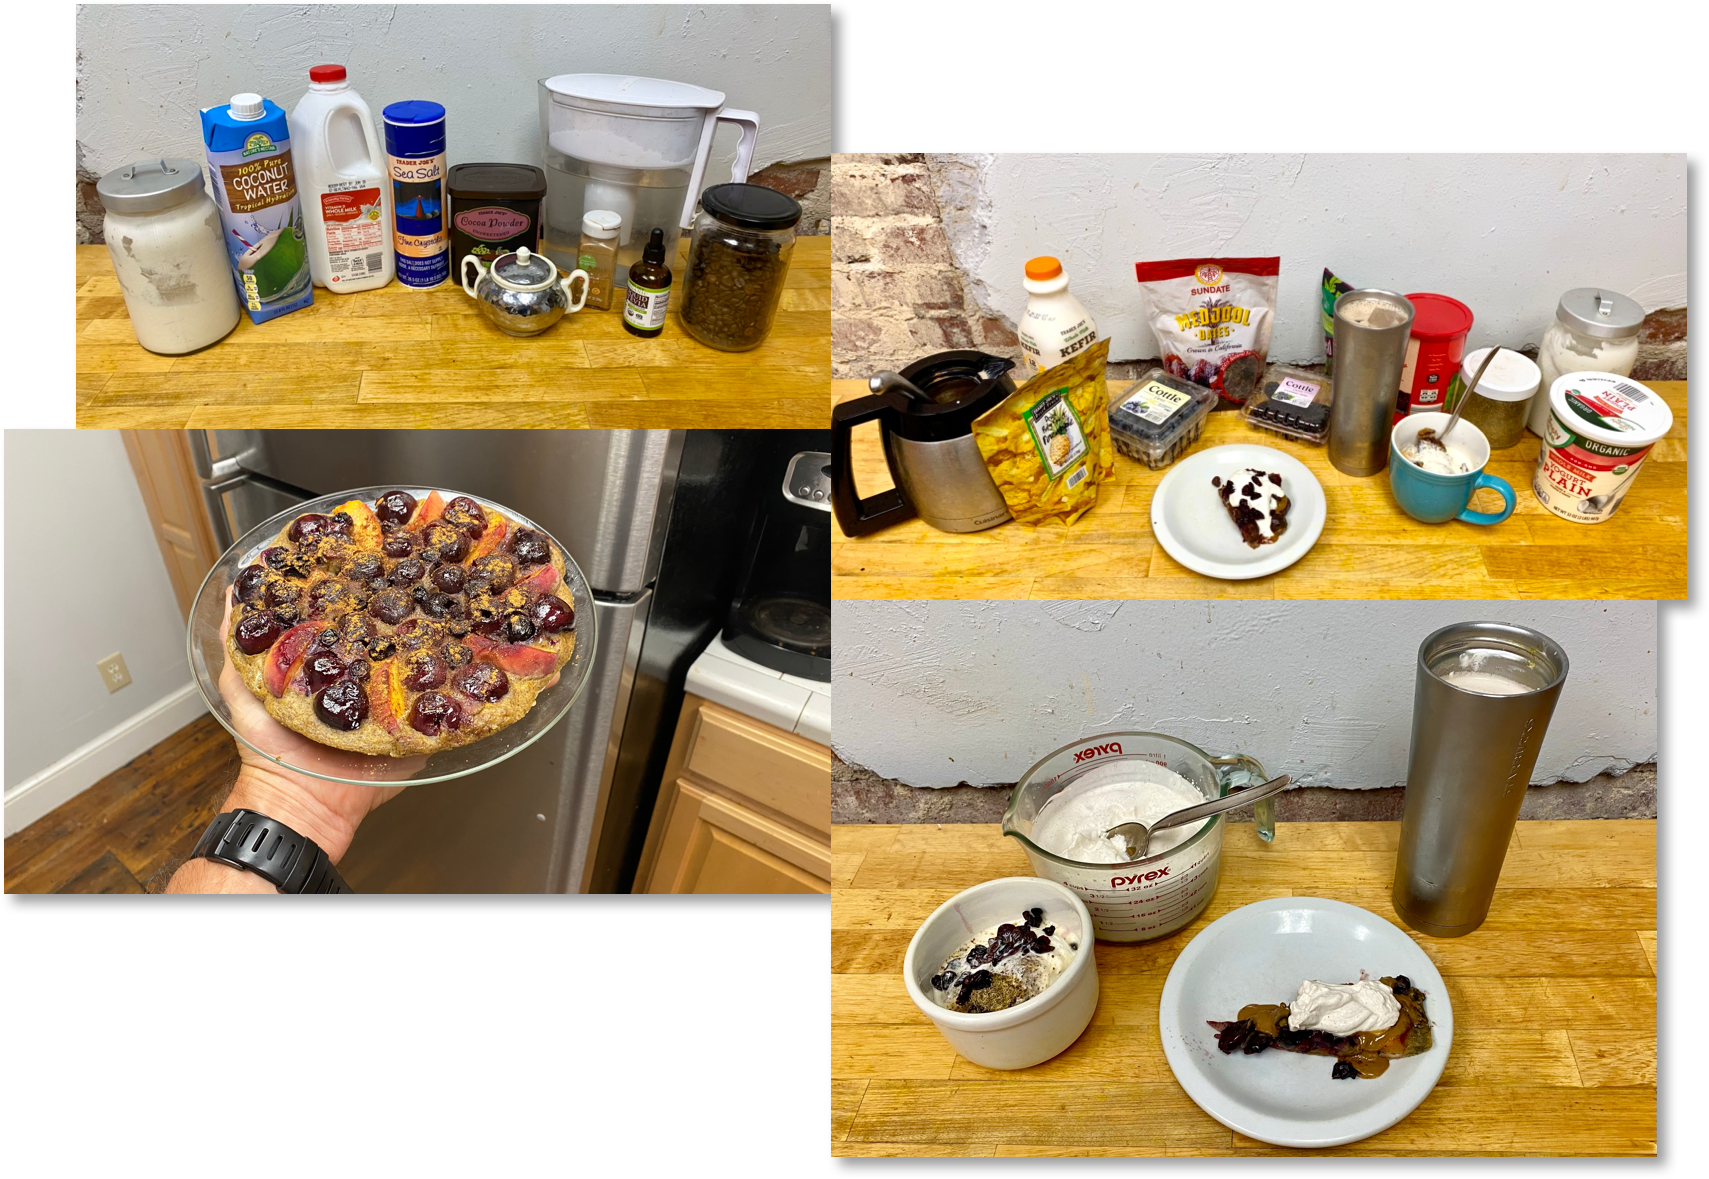
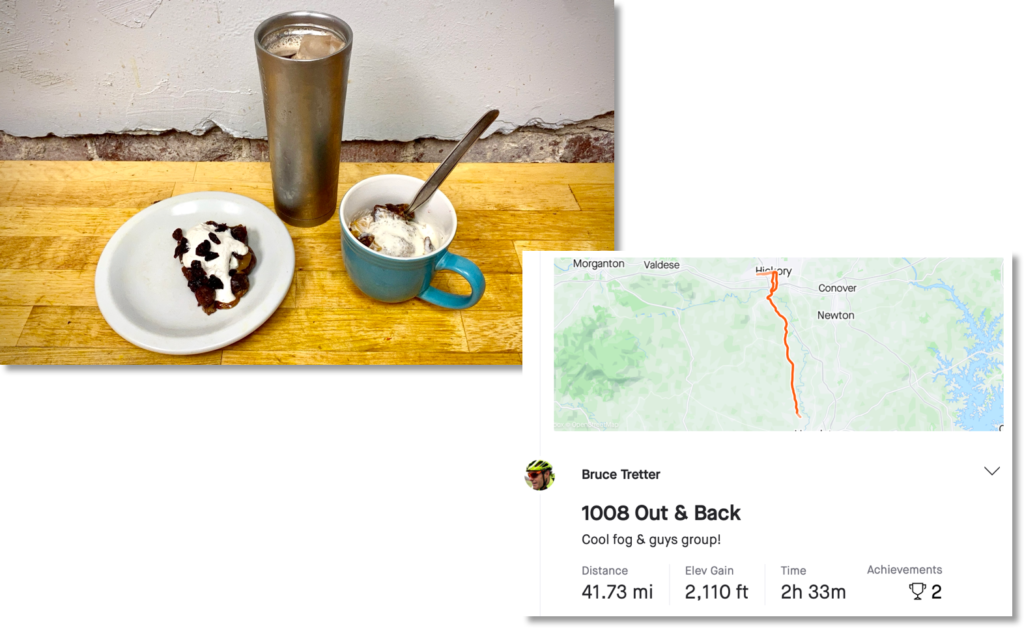
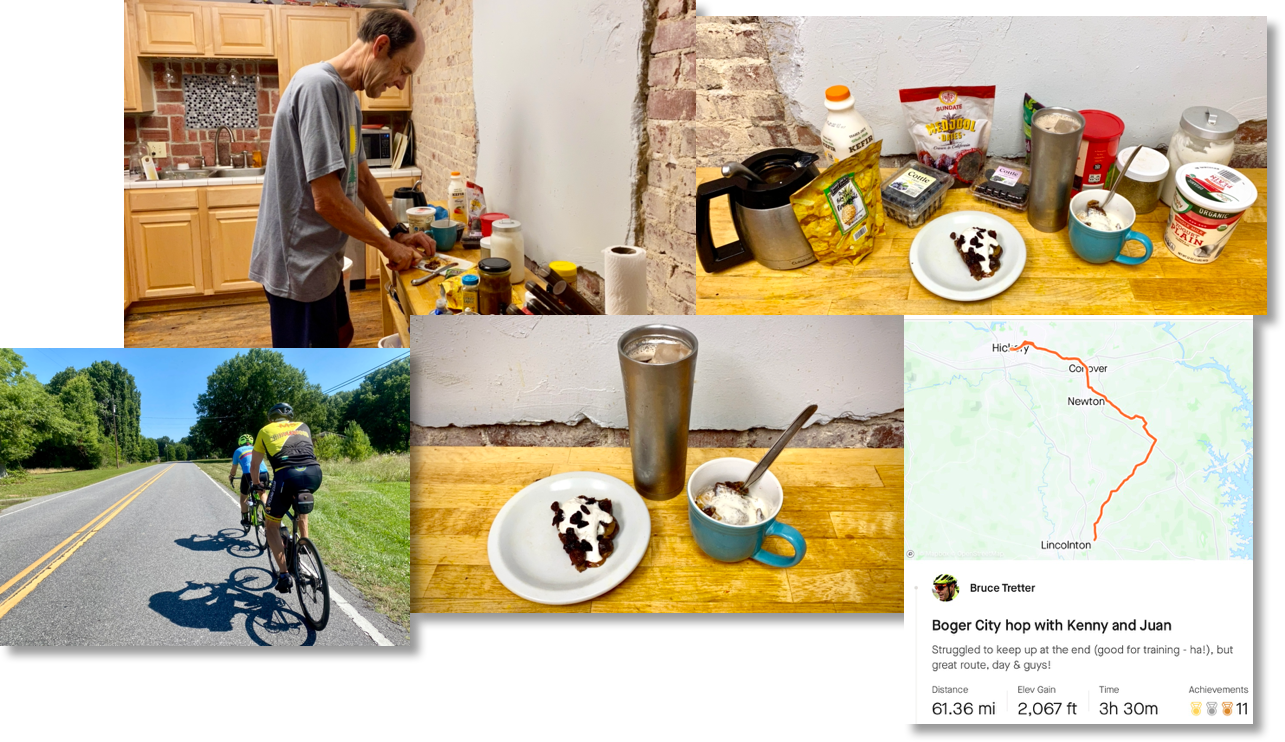
Last post, Rocket Fuel to Power Your Body in Motion, showed very much the same breakfast I had this morning before popping out for a bike ride with good Hickory buds shown below.
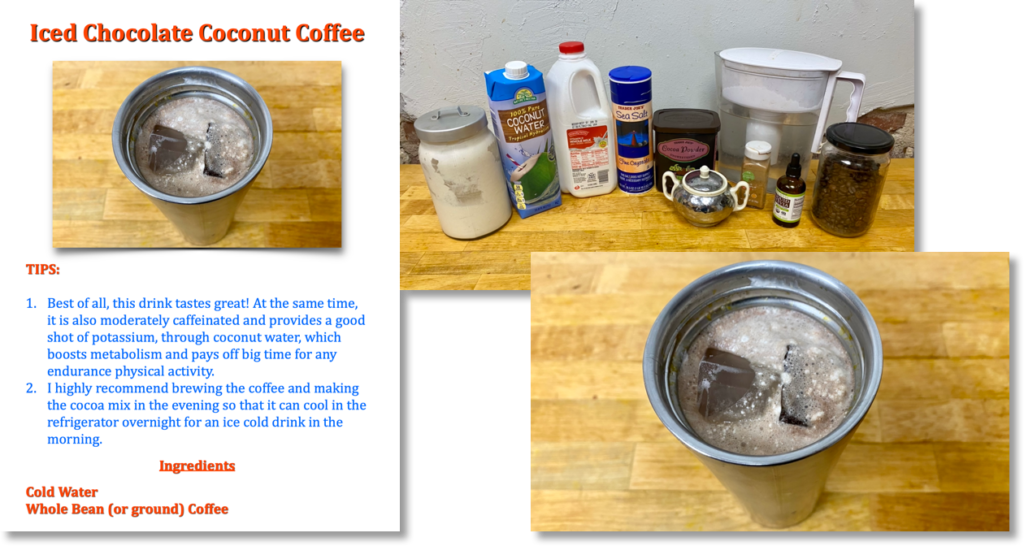
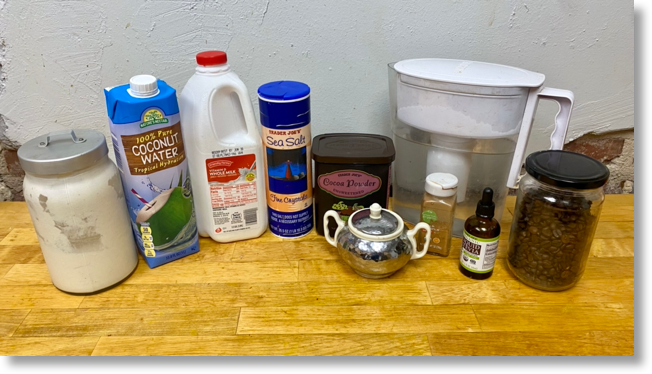
Most importantly, this cold drink tastes great! At the same time, it’s moderately caffeinated and provides a good shot of potassium, through coconut water, which boosts metabolism and pays off big time for any endurance physical activity: cycling, running, hiking, walking, full-on yard work – and more. (I usually drink 2 tumblers (about 20 ounces X 2) full of that drink before a ride and then supplement with water on the fly – and never come home dehydrated.)
For optimal results, I highly recommend brewing the coffee and making the chocolate mix in the evening so that it can cool in the fridge overnight for an ice cold drink in the morning.
Rockets, power, motion! Please tell me you find that “let’s go!” motivating! When it comes to fuel to power endurance exercise/any physical activity to keep your body in motion, the key is making sure to take in fats, protein, some carbohydrates and fluids – and having them all with full-on flavor.
Here’s what I had recently for the hop on the bike shown above with terrific good friends.
The fats, from whole milk Greek yogurt, whole milk kefir, almond-peanut butter and freshly made whipped cream, combined with protein from egg and whole grain flour in the fruit pancake, Greek yogurt and kefir gave me slow-burning sustained energy. The carbohydrates: a little sugar in my iced coffee/chocolate/coconut water drink, cookie spread on my pancake slice and fruit, dried fruit and jam in my fruit and yogurt mix, gave me instant energy to start my ride. And front-loading fluids with 30-40 ounces of iced coffee/chocolate/coconut water got me going well hydrated so that I just needed to top off with water while I rode, and the potassium in coconut water helped both prevent cramps and improve energy metabolism.
Of course, everybody’s body and fuel requirements are different, and only YOU know YOU. That means it’s most important to pay attention to what YOU eat and drink and how that affects YOUR physical performance, no matter what kind of physical activity YOU do. Still, though the fine details differ person to person, the base components are the same: carbohydrates for quick burning energy, a good shot of fat and protein for long-burning, sustained energy and plenty of fluids to start off well hydrated.
The next few posts, starting with iced coffee/chocolate/coconut water (killer good!), will show how to make each of the 3 pieces shown above that I have regularly – and always with a little improvised variety for flavor fun, before hopping out on the bike.

 March 13th, 2024

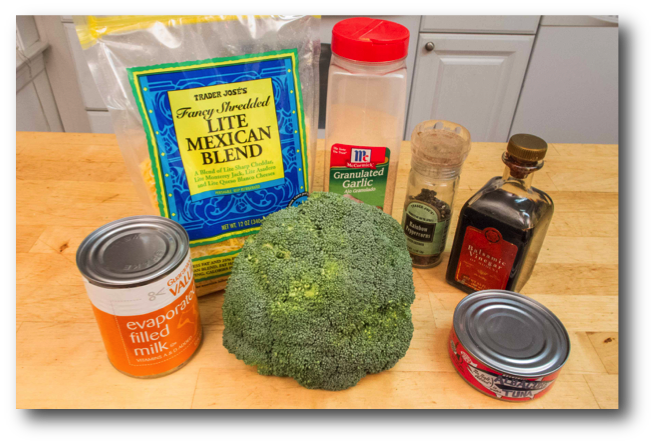 As shown in the ingredients picture above, the key to making the lighter Alfredo sauce is substituting heavy cream with evaporated milk and using fat-reduced (“lite”) cheese with no loss in Alfredo sauce flavor or creamy texture. Here’s a nutrition label comparison showing that ounce for ounce, heavy cream contains more than twice the calories and five times the fat as evaporated milk (1 ounce = 2 tablespoons; you have to double the numbers you see in the heavy cream label to make an equal comparison with evaporated milk).